

Create React App
We will use the most popular and well-maintained starter from Facebook - create-react-app.
| $ npm install -g create-react-app | |
| $ create-react-app <PROJECT_NAME> | |
| $ cd <PROJECT_NAME> |
Redux
To have a predictable state container in our app, we will use the most established library for state management - Redux. We could also include redux-act to make actions and reducers more concise and readable.
| $ npm install --save redux react-redux redux-act |
With redux-act, we could leverage the functional nature of JavaScript to write actions and reducers this way:
| import { createAction, createReducer } from 'redux-act' | |
| export const someAction = createAction() | |
| const DEFAULT_STATE = { | |
| something: true | |
| } | |
| export default createReducer( | |
| { | |
| [someAction]: (state, something) => ({ ...state, something }) | |
| }, | |
| DEFAULT_STATE | |
| ) |
Also, we will most likely benefit from using two more libraries with redux. It is redux-devtools-extension and redux-form. The first one allows us to see the state and its changes in the chrome extension. The second one simplifies work with forms — must-have if we have a lot of them.
| npm install --save redux-devtools-extension redux-form |
Redux Saga
Redux-saga is a library that helps us to work with async code, such as requests and background app work. It is better to read some tutorials about redux-saga first if you don’t know what it is. In short terms, we subscribe generator function to action, and when this action occurs, it will trigger our saga. In this generator function, we can make all the work we don’t do in the reducer.
| $ npm install --save redux-saga |
All Together
We will keep all the reducers and actions in separate directories.
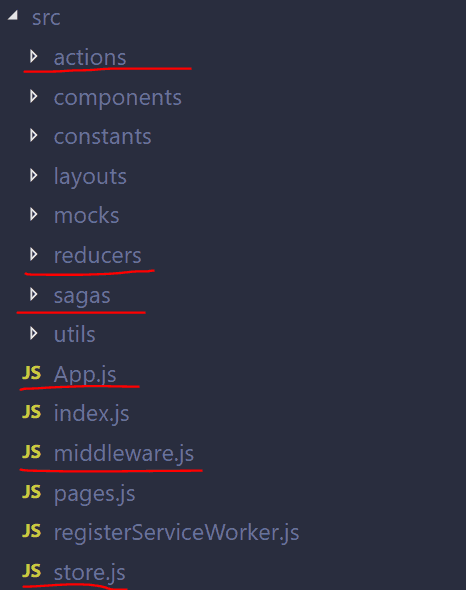
In the directory with reducers, we will create index.js file with references to all reducers.
| import navigation from './navigation' | |
| import auth from './auth' | |
| import something from './something' | |
| export default { | |
| navigation, | |
| auth, | |
| something | |
| } |
After that, we will create a redux store for our app by combining all of our reducers and applying middleware.
| import { createStore, combineReducers, applyMiddleware } from 'redux' | |
| import { composeWithDevTools } from 'redux-devtools-extension' | |
| import { reducer as formReducer } from 'redux-form' | |
| import reducers from './reducers' | |
| import middleware from './middleware' | |
| export default createStore( | |
| combineReducers({ | |
| ...reducers, | |
| form: formReducer | |
| }), | |
| composeWithDevTools(applyMiddleware(...middleware)) | |
| ) |
Next, we will create middleware.js file for redux-saga.
| import createSagaMiddleware from 'redux-saga' | |
| export const sagaMiddleware = createSagaMiddleware() | |
| export default [sagaMiddleware] |
Once we have sagas and reducers in place, it is time to put everything together by wrapping our App component with Provider.
| import React from 'react' | |
| import { Provider } from 'react-redux' | |
| import store from './store' | |
| import saga from './sagas/' | |
| import Main from './layouts/main' | |
| import { sagaMiddleware } from './middleware' | |
| const App = () => ( | |
| <Provider store={store}> | |
| <Main /> | |
| </Provider> | |
| ) | |
| export default App | |
| sagaMiddleware.run(saga) |
Saga and Actions
As we saw earlier, to run a saga, we need to subscribe to action first.
| const someAction = createAction('some action') | |
| function* someSaga() { | |
| // make some async staff | |
| } | |
| export default function* saga() { | |
| yield takeLatest(someAction.getType(), someSaga) | |
| // and for each action the same staff ... | |
| } | |
In the code snippet above, we can see that it is a little bit tedious to connect each action to an appropriate saga. To make it cleaner and easier to maintain, we will create the file in the sagas directory with the same name as the file with action declarations. Then in the newly created file, we will add a saga with the same name as the action name. By using this convention, we can go through each batch of actions and sagas pair and connect them in a loop.
| import { takeLatest } from 'redux-saga/effects' | |
| import * as loginActions from '../actions/login' | |
| import * as loginSagas from './login' | |
| import * as genericActions from '../actions/generic' | |
| import * as genericSagas from './generic' | |
| export default function* saga() { | |
| const relations = [ | |
| [loginActions, loginSagas], | |
| [genericActions, genericSagas], | |
| ] | |
| for (const [actions, sagas] of relations) { | |
| for (const [actionName, action] of Object.entries(actions)) { | |
| const saga = sagas[actionName] | |
| if (saga) yield takeLatest(action.getType(), saga) | |
| } | |
| } | |
| } |
State and Components
Also, we could utilize the function below with which we can connect the component to the store easier.
| export const connectTo = (mapStateToProps, actions, Component) => { | |
| const mapDispatchToProps = dispatch => bindActionCreators(actions, dispatch) | |
| return connect(mapStateToProps, mapDispatchToProps)(Component) | |
| } | |
| const doSomeStaff = createAction() | |
| export default connectTo( | |
| // map state to props | |
| state => state.something, | |
| // object with actions | |
| { doSomeStaff }, | |
| // component | |
| ({ someStaff, doSomeStaff }) => ( | |
| <button onClick={doSomeStaff}>{someStaff}</button> | |
| ) |