

Sign-in with LinkedIn
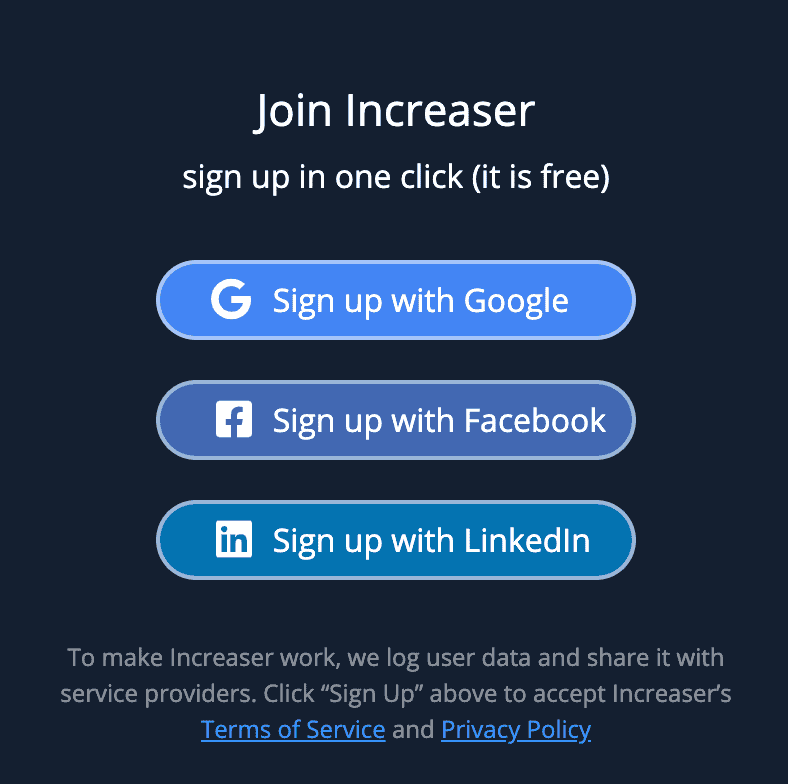
For a long time, Increaser had presented only two ways for a user to sign in — via Google and Facebook. These two providers already cover the majority of the potential user, but if it is easy to let more people in, why not to do so? In this story, my goal is to explain to you both back-end and front-end parts so that you can add LinkedIn sign-in functionality in no-time.
Plan
- Get a LinkedIn URL for authorization.
- Implement a component with “Sign In with LinkedIn” button.
- Authorization logic on redirection page.
- Back-end(optional).
Step 1. LinkedIn URL
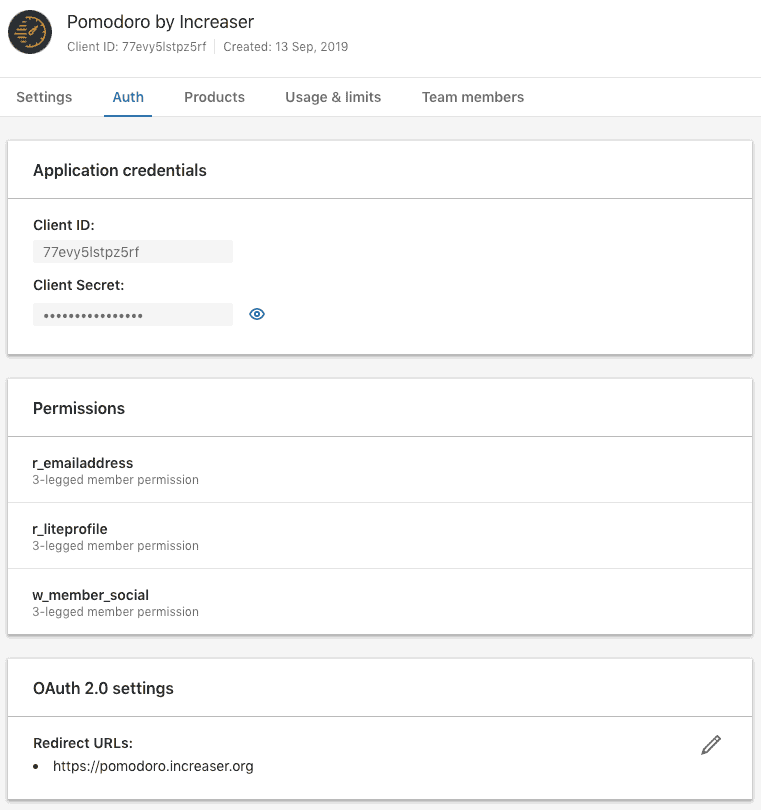
To make authorization with LinkedIn, we first want to create an app in LinkedIn Developers. We need to make sure that we’ve selected permissions shown below.
Now, let’s make a URL for the user to go through LinkedIn part of the authorization.
import { getURLWithQueryParams } from "../utils/generic"

export const LINKEDIN_STATE = 'random_string'
const LINKEDIN_SCOPE = 'r_liteprofile r_emailaddress'
const LINKEDIN_RIDERECT = '<REDIRECT_YOU_SPECIFIED_IN_LINKEDIN>'
const LINKEDIN_CLIENT_ID = '<TAKE_IT_FROM_LINKEDIN>'
export const LINKEDIN_URL = getURLWithQueryParams('https://www.linkedin.com/oauth/v2/authorization', {
  response_type: "code",
  client_id: LINKEDIN_CLIENT_ID,
  redirect_uri: LINKEDIN_RIDERECT,
  state: LINKEDIN_STATE,
  scope: LINKEDIN_SCOPE
})
LINKEDIN_STATE is a unique string value of your choice that is hard to guess. Used to prevent CSRF.
To build the URL, we write a function that receives the base part of the URL and object with parameters. It will return URL made by merging base part and parameters converted to a query string.
// ...
export const getURLWithQueryParams = (base, params) => {
  const query = Object
    .entries(params)
    .map(([key, value]) => `${key}=${encodeURIComponent(value)}`)
    .join('&')

  return `${base}?${query}`
}
Step 2. Sign-in Component
Increaser provides a few ways to sign in by displaying a component with different buttons.
If we focus on the LinkedIn button and remove code related to other providers, we end up with component shown below.
class Auth extends React.Component {
  render() {
    return (
      {// ...}
      <Button onClick={this.signInWithLinkedin} />
      {// ...}
    )
  }

  signInWithLinkedin() {// ...}

  receiveLinkedInMessage = (event) => {// ...}

  componentWillUnmount() {// ...}
}
When a user decides to go with LinkedIn, we are opening a new window with a URL from the constants module. Some browser may open a new tab, instead of a new window, but don’t worry, it doesn’t change anything.
import { LINKEDIN_URL } from '../constants/auth'

class Auth extends React.Component {
  // ...
  signInWithLinkedin() {
    this.popup = window.open(LINKEDIN_URL, '_blank', 'width=600,height=600')
    window.addEventListener('message', this.receiveLinkedInMessage)
  }
}
After completing the LinkedIn authorization, the user will be redirected to the page specified in URL. From there we will post a message back to the window that opened popup. To handle this message, we add an event listener.
class Auth extends React.Component {
  // ...
  receiveLinkedInMessage = ({ origin, data: { state, code, error, ...rest} }) => {
    if (origin !== window.location.origin || state !== LINKEDIN_STATE) return

    if (code) {
      this.props.receiveProviderToken({ provider: PROVIDER.LINKEDIN, token: code })
    } else if (error && !['user_cancelled_login', 'user_cancelled_authorize'].includes(error)) {
      this.props.failToReceiveProviderToken({ provider: PROVIDER.LINKEDIN, error: { error, ...rest} })
    }
    this.popup.close()
  }
  // ...
}
If everything good with the message, we will continue the authorization process by making a request to the back-end.
On component unmount, we want to remove the event listener, and close popup if it exists.
class Auth extends React.Component {
  // ...
  componentWillUnmount() {
    window.removeEventListener('message', this.receiveLinkedInMessage)
    this.popup && this.popup.close()
  }
}
Step 3. Redirecting Page
When a user appears on the redirection page, we are getting parameters from the URL and post a message back to the window that opened popup.
import { queryToObject } from '../utils/generic'

// ...
if (window.location.search) {
  const params = queryToObject(window.location.search)
  if (params.state === LINKEDIN_STATE && window.opener) {
    window.opener.postMessage(params)
  }
}
// ...
To convert the query part of the URL into an object, we can write the function shown below.
export const queryToObject = queryString => {
  const pairsString = queryString[0] === '?' ? queryString.slice(1) : queryString
  const pairs = pairsString
    .split('&')
    .map(str => str.split('=').map(decodeURIComponent))
  return pairs.reduce((acc, [key, value]) => key ? { ...acc, [key]: value } : acc, {})
}
Step 4. Back-end (optional)
On the back-end, we will write a function that receives code and returns user name, email, and id after calling LinkedIn API.
const { URLSearchParams } = require('url')
const fetch = require('node-fetch')

const LINKEDIN_ACCESS_TOKEN = `https://www.linkedin.com/oauth/v2/accessToken`
const LINKEDIN_CLIENT_ID = '<YOUR_LINKEDIN_CLIENT_ID>'
const LINKEDIN_CLIENT_SECRET = '<YOUR_LINKEDIN_CLIENT_SECRET>'
const LINKEDIN_RIDERECT_URI = 'https://pomodoro.increaser.org'
const LINKEDIN_NAME_URL = 'https://api.linkedin.com/v2/me'
const LINKEDIN_EMAIL_URL =
  'https://api.linkedin.com/v2/emailAddress?q=members&projection=(elements*(handle~))'

const fetchJSON = (...args) => fetch(...args).then(r => r.json())

const getValidatedWithLinkedinUser = async code => {
  const body = new URLSearchParams({
    grant_type: 'authorization_code',
    code,
    redirect_uri: LINKEDIN_RIDERECT_URI,
    client_id: LINKEDIN_CLIENT_ID,
    client_secret: LINKEDIN_CLIENT_SECRET
  })
  const { access_token } = await fetchJSON(
    LINKEDIN_ACCESS_TOKEN,
    {
      method: 'POST',
      body
    }
  )
  const payload = {
    method: 'GET',
    headers: { Authorization: `Bearer ${access_token}` }
  }
  const {
    localizedFirstName,
    localizedLastName,
    id
  } = await fetchJSON(
    LINKEDIN_NAME_URL,
    payload
  )
  const { elements } = await fetchJSON(LINKEDIN_EMAIL_URL, payload)

  return {
    name: `${localizedFirstName} ${localizedLastName}`,
    email: elements[0]['handle~'].emailAddress,
    id
  }
}