Implementing an Effective Onboarding Flow in React for Enhanced User Engagement


Implementing an Effective Onboarding Flow in React
In this article, we will delve into the implementation of an onboarding flow within a React application. There are several approaches to user onboarding, but we'll focus on one that has proven to be highly effective. This method involves redirecting the user to a dedicated onboarding page, where they must navigate through a series of steps. Each step is designed to educate the user about a specific feature or concept and connect their problem with the solution your app provides. By educating and persuading users at each step, you can guide them toward completing the onboarding process. You can experience the final result by signing up at Increaser, and you can find all the reusable components and utilities discussed in this article in the RadzionKit repository.
The Importance of Onboarding for User Retention and Engagement
Onboarding serves the crucial purpose of increasing user retention and engagement. After completing the onboarding process, users should already feel invested in your application and understand how to use it to solve their problems or achieve their goals. With this goal in mind, we must carefully select the best format for our onboarding flow. Some apps utilize tooltips, but these might not be as effective or engaging. Others opt for a series of modals, which also fall short in providing the best experience. This is because modals essentially follow the same principle as a dedicated page, but with a smaller space to work with.
Implementing Conditional Redirection with the RequiresOnboarding Component
To redirect the user to the onboarding page, we'll wrap some of our pages with the RequiresOnboarding component. This component checks if the user has completed the onboarding process and redirects them to the onboarding page if they haven't. We don't wrap every page with this component because certain pages should be accessible without completing the onboarding flow. For example, consider a user who purchased a lifetime version of the app elsewhere. In this scenario, they will follow a link that takes them to a code redemption page, and they should be able to complete the product activation without going through the onboarding flow.
import { AppPath } from "@increaser/ui/navigation/AppPath"
import { useAssertUserState } from "@increaser/ui/user/UserStateContext"
import { ComponentWithChildrenProps } from "@lib/ui/props"
import { useRouter } from "next/router"
import { useEffect } from "react"

export const RequiresOnboarding = ({
  children,
}: ComponentWithChildrenProps) => {
  const { finishedOnboardingAt } = useAssertUserState()
  const { push } = useRouter()

  useEffect(() => {
    if (!finishedOnboardingAt) {
      push(AppPath.Onboarding)
    }
  }, [finishedOnboardingAt, push])

  if (!finishedOnboardingAt) return null

  return <>{children}</>
}
We store the finishedOnboardingAt value in the database along with other user information. This value is updated when the user completes the last step of the onboarding process through a regular updateUser procedure. If you're curious about managing backend APIs within TypeScript monorepos, check out this article.
import { BasedOnScreenWidth } from "@lib/ui/layout/BasedOnScreenWidth"
import { SmallScreenOnboarding } from "./SmallScreenOnboarding"
import { NormalScreenOnboarding } from "./NormalScreenOnboarding"
import { OnboardingProvider } from "./OnboardingProvider"
import { UserStateOnly } from "../user/state/UserStateOnly"
import { PageMetaTags } from "@lib/next-ui/metadata/PageMetaTags"
import { productName } from "@increaser/config"

export const OnboardingPage = () => {
  return (
    <UserStateOnly>
      <PageMetaTags title={[`🚀 Setup`, productName].join(" | ")} />
      <OnboardingProvider>
        <BasedOnScreenWidth
          value={800}
          less={() => <SmallScreenOnboarding />}
          more={() => <NormalScreenOnboarding />}
        />
      </OnboardingProvider>
    </UserStateOnly>
  )
}
Ensuring User Authentication and Data Loading with the UserStateOnly Component
Our onboarding page, like other pages within the app, is wrapped with the UserStateOnly component. This component ensures that the user is authenticated and redirects them to the login page if they are not. In addition to this, it waits until the user state is loaded before rendering its children. At Increaser, we use a comprehensive query to retrieve nearly all the necessary user data. Although this query is blocking, users typically experience negligible delays thanks to the efficient caching of user data in local storage through react-query. This strategy ensures that the app's functionality is readily accessible upon subsequent launches, providing a seamless user experience.
import { ComponentWithChildrenProps } from "@lib/ui/props"

import { useEffect } from "react"
import { useAuthRedirect } from "@increaser/app/auth/hooks/useAuthRedirect"
import { useAuthSession } from "@increaser/app/auth/hooks/useAuthSession"
import { useUserState } from "@increaser/ui/user/UserStateContext"

export const UserStateOnly = ({ children }: ComponentWithChildrenProps) => {
  const { state } = useUserState()
  const { toAuthenticationPage } = useAuthRedirect()

  const [authSession] = useAuthSession()

  useEffect(() => {
    if (!authSession) {
      toAuthenticationPage()
    }
  }, [authSession, toAuthenticationPage])

  return state ? <>{children}</> : null
}
Managing State with the OnboardingProvider Component
To facilitate the development of the onboarding flow and maintain organized state management, we use the OnboardingProvider component. Its state includes:
currentStep: the current step of the onboarding processcompletedSteps: an array of steps that the user has already completedisNextStepDisabled: a string containing the reason why the next step is disabled, orfalseif the next step is enabledsetCurrentStep: a function used to navigate between steps
import { ComponentWithChildrenProps } from "@lib/ui/props"
import { createContextHook } from "@lib/ui/state/createContextHook"
import { createContext, useCallback, useEffect, useMemo, useState } from "react"
import { analytics } from "../analytics"
import { useUpdateUserMutation } from "../user/mutations/useUpdateUserMutation"
import { match } from "@lib/utils/match"
import { isEmpty } from "@lib/utils/array/isEmpty"
import { useProjects } from "@increaser/ui/projects/ProjectsProvider"
import { useAssertUserState } from "@increaser/ui/user/UserStateContext"
import { OnboardingStep, onboardingSteps } from "./OnboardingStep"

type OnboardingState = {
  completedSteps: OnboardingStep[]
  currentStep: OnboardingStep
  isNextStepDisabled: string | false
  setCurrentStep: (step: OnboardingStep) => void
}

const OnboardingContext = createContext<OnboardingState | undefined>(undefined)

export const OnboardingProvider = ({
  children,
}: ComponentWithChildrenProps) => {
  const [currentStep, setCurrentStep] = useState<OnboardingStep>(
    onboardingSteps[0]
  )

  const [completedSteps, setCompletedSteps] = useState<OnboardingStep[]>([])

  const onCurrentStepChange = useCallback(
    (step: OnboardingStep) => {
      setCurrentStep(step)
      const previousStep = onboardingSteps[onboardingSteps.indexOf(step) - 1]
      if (previousStep && !completedSteps.includes(previousStep)) {
        analytics.trackEvent(
          `Completed onboarding step #${onboardingSteps.indexOf(previousStep)}`
        )
        setCompletedSteps((prev) => [...prev, previousStep])
      }
    },
    [completedSteps]
  )

  const { mutate: updateUser } = useUpdateUserMutation()

  const { activeProjects } = useProjects()
  const isNextStepDisabled = useMemo(
    () =>
      match<OnboardingStep, string | false>(currentStep, {
        projects: () =>
          isEmpty(activeProjects)
            ? "You need to create at least one project"
            : false,
        workBudget: () => false,
        weeklyGoals: () => false,
        schedule: () => false,
        dailyHabits: () => false,
        tasks: () => false,
        focus: () => false,
      }),
    [activeProjects, currentStep]
  )

  const { finishedOnboardingAt } = useAssertUserState()
  useEffect(() => {
    if (finishedOnboardingAt) return
    if (isNextStepDisabled) return

    const isLastStep =
      currentStep === onboardingSteps[onboardingSteps.length - 1]
    if (!isLastStep) return

    analytics.trackEvent("Finished onboarding")
    updateUser({ finishedOnboardingAt: Date.now() })
  }, [currentStep, finishedOnboardingAt, isNextStepDisabled, updateUser])

  return (
    <OnboardingContext.Provider
      value={{
        currentStep,
        setCurrentStep: onCurrentStepChange,
        completedSteps,
        isNextStepDisabled,
      }}
    >
      {children}
    </OnboardingContext.Provider>
  )
}

export const useOnboarding = createContextHook(
  OnboardingContext,
  "OnboardingContext"
)
Currently, the app has seven onboarding steps, but this number may change in the future. We derive the OnboardingStep union type from the onboardingSteps array, which maintains all the steps in an ordered list. Additionally, we define the onboardingStepTargetName object that maps each step to a string describing the target of that step. This mapping is used to display a title for each step.
export const onboardingSteps = [
  "projects",
  "workBudget",
  "weeklyGoals",
  "schedule",
  "dailyHabits",
  "tasks",
  "focus",
] as const
export type OnboardingStep = (typeof onboardingSteps)[number]

export const onboardingStepTargetName: Record<OnboardingStep, string> = {
  projects: "Add projects",
  workBudget: "Define work budget",
  weeklyGoals: "Outline weekly goals",
  schedule: "Arrange schedule",
  dailyHabits: "Establish daily habits",
  tasks: "List tasks",
  focus: "Start focus session",
}
When the consumer of the provider changes the current step, we do more than just update the state. We also find the previous step and add it to the completedSteps array, which we use to highlight the user's progress in the onboarding flow UI. Additionally, it's important to have a funnel report in our analytics, so we track every completed step. We use the index of the step instead of the name because we can change the step name or reorder steps, and we don't want that to affect our analytics.
Since every step of the onboarding process alters the user's state, which is stored in a single context, we can easily determine if a particular step is disabled. Currently, there is only one step that requires user input: there must be at least one project added. This is because the app's most important functionality, time tracking, is not available without it. Other steps either have default values or correspond to features that do not affect the app's core functionality.
We use the match function from RadzionKit to map the current step to a validator function that returns a string if the step is disabled. This pattern is similar to a switch-case but is more convenient. You will also see the Match component later, which applies the same principle but for rendering the appropriate component.
export function match<T extends string | number | symbol, V>(
  value: T,
  handlers: { [key in T]: () => V }
): V {
  const handler = handlers[value]

  return handler()
}
To track the completion of the onboarding flow in analytics and set the finishedOnboardingAt field in the database, we use a useEffect hook that watches for changes in the currentStep. When the currentStep becomes the last one and it's not disabled, it indicates that the user has completed the onboarding flow.
To make it more convenient for consumers of the provider to access the state, we provide the useOnboarding hook, which is created with the createContextHook utility. This utility receives the OnboardingContext and the name of the context as arguments and returns a hook that throws an error if the context is not provided.
import { Context as ReactContext, useContext } from "react"

export function createContextHook<T>(
  Context: ReactContext<T | undefined>,
  contextName: string
) {
  return () => {
    const context = useContext(Context)

    if (!context) {
      throw new Error(`${contextName} is not provided`)
    }

    return context
  }
}
Designing the Onboarding Page for Different Screen Sizes
Now, let's return to the onboarding page. Since we aim to utilize the available screen space effectively, we implement conditional rendering based on screen width. For small screens, we use the SmallScreenOnboarding component, and for normal screens, we use the NormalScreenOnboarding component. We'll start with the desktop version first, as it's more important for web apps like ours, where users more frequently start using the app on a desktop rather than on a mobile device.
import { OnboardingOverview } from "./OnboardingOverview"
import { OnboardingStepEducation } from "./OnboardingStepEducation"
import { OnboardingStepForm } from "./OnboardingStepForm"
import { ComprehensiveOnboardingContainer } from "@lib/ui/onboarding/ComprehensiveOnboardingContainer"

export const NormalScreenOnboarding = () => (
  <ComprehensiveOnboardingContainer>
    <OnboardingOverview />
    <OnboardingStepForm />
    <OnboardingStepEducation />
  </ComprehensiveOnboardingContainer>
)
Our layout here is a three-column grid. The first column contains an overview of the onboarding flow, which won't take up much space. The second column contains the most important part of the onboarding flow, where the user will input the data required for the current step. The third column contains educational content that explains the concept behind the current step. To visually separate the columns, we give the first column a background color with less contrast than the other two columns, as the user will interact less with this section compared to the others. Additionally, we add a dashed border between the second and third columns.
import styled from "styled-components"
import { getColor } from "../theme/getters"

export const ComprehensiveOnboardingContainer = styled.div`
  display: grid;
  grid-template-columns: auto 1fr 1fr;
  height: 100%;

  > * {
    &:first-child {
      background: ${getColor("foreground")};
    }

    &:last-child {
      border-left: 1px dashed ${getColor("mistExtra")};
    }
  }
`
Tracking Progress with the OnboardingOverview Component
The OnboardingOverview component aims to show the user's progress and allow navigation between steps. In the title of this section, we display the number of completed steps out of the total number of steps, highlighting it in green. In the body of this section, we iterate over each step and display it using the OnboardingProgressItem component. To determine if a step is completed, current, or enabled, we use the data provided by the OnboardingProvider through the useOnboarding hook.
import { HStack, VStack } from "@lib/ui/layout/Stack"
import { useOnboarding } from "./OnboardingProvider"
import { Text } from "@lib/ui/text"
import { without } from "@lib/utils/array/without"
import { OnboardingSection } from "./OnboardingSection"
import { onboardingStepTargetName, onboardingSteps } from "./OnboardingStep"
import { OnboardingProgressItem } from "@lib/ui/onboarding/OnboardingProgressItem"

export const OnboardingOverview = () => {
  const { currentStep, setCurrentStep, completedSteps } = useOnboarding()

  return (
    <OnboardingSection
      title={
        <HStack alignItems="center" gap={8}>
          <Text>Quick Setup</Text>
          <Text color="success">
            {completedSteps.length} / {onboardingSteps.length}
          </Text>
        </HStack>
      }
    >
      <VStack gap={4}>
        {onboardingSteps.map((step) => {
          const isCompleted = completedSteps.includes(step)
          const isCurrent = currentStep === step
          const isEnabled =
            isCompleted ||
            without(onboardingSteps, ...completedSteps)[0] === step

          return (
            <OnboardingProgressItem
              key={step}
              isCurrent={isCurrent}
              isCompleted={isCompleted}
              isEnabled={isEnabled}
              onClick={() => setCurrentStep(step)}
              name={onboardingStepTargetName[step]}
            />
          )
        })}
      </VStack>
    </OnboardingSection>
  )
}
The OnboardingProgressItem component displays an indicator of step completion next to the step name. The indicator is a gray circle that contains a check icon at the center when the step is completed.
import { HStack } from "@lib/ui/layout/Stack"
import { Text } from "@lib/ui/text"
import styled, { css } from "styled-components"
import { round } from "@lib/ui/css/round"
import { getColor, matchColor } from "@lib/ui/theme/getters"
import { sameDimensions } from "@lib/ui/css/sameDimensions"
import { transition } from "@lib/ui/css/transition"
import { interactive } from "@lib/ui/css/interactive"
import { verticalPadding } from "@lib/ui/css/verticalPadding"
import { IconWrapper } from "@lib/ui/icons/IconWrapper"
import { CheckIcon } from "@lib/ui/icons/CheckIcon"
import { centerContent } from "@lib/ui/css/centerContent"

const Container = styled(HStack)<{ isCurrent: boolean; isEnabled: boolean }>`
  color: ${matchColor("isCurrent", {
    true: "contrast",
    false: "textSupporting",
  })};

  align-items: center;
  gap: 8px;
  ${verticalPadding(8)}
  ${transition};

  ${({ isEnabled }) => isEnabled && interactive};
  ${({ isCurrent, isEnabled }) =>
    isEnabled &&
    !isCurrent &&
    css`
      &:hover {
        color: ${getColor("text")};
      }
    `}
`

const CheckContainer = styled.div<{ isCompleted: boolean }>`
  ${round};
  ${centerContent};
  background: ${getColor("mistExtra")};

  ${sameDimensions(24)};

  color: ${matchColor("isCompleted", {
    true: "success",
    false: "transparent",
  })};
  font-size: 14px;
`

type OnboardingProgressItemProps = {
  isCurrent: boolean
  isCompleted: boolean
  isEnabled: boolean
  onClick: () => void
  name: string
}

export const OnboardingProgressItem = ({
  isCurrent,
  isCompleted,
  isEnabled,
  onClick,
  name,
}: OnboardingProgressItemProps) => {
  return (
    <Container
      isCurrent={isCurrent}
      onClick={isEnabled ? () => onClick() : undefined}
      isEnabled={isEnabled}
    >
      <CheckContainer isCompleted={isCompleted}>
        <IconWrapper>
          <CheckIcon />
        </IconWrapper>
      </CheckContainer>
      <Text weight="semibold">{name}</Text>
    </Container>
  )
}
Navigating Steps with the OnboardingStepForm Component
The primary part of the onboarding page is the OnboardingStepForm component. Here we reuse the OnboardingSection component to maintain a consistent layout across all three sections of the page. To display the title of the current step, we use the onboardingStepTargetName object that we saw earlier. This ensures that the title will be the same as in the corresponding progress item in the overview section.
import { useOnboarding } from "./OnboardingProvider"

import { OnboardingPrimaryNavigation } from "./OnboardingPrimaryNavigation"
import { OnboardingSection } from "./OnboardingSection"
import { OnboardingStepFormContent } from "./OnboardingStepFormContent"
import { onboardingStepTargetName } from "./OnboardingStep"

export const OnboardingStepForm = () => {
  const { currentStep } = useOnboarding()

  return (
    <OnboardingSection
      footer={<OnboardingPrimaryNavigation />}
      title={onboardingStepTargetName[currentStep]}
    >
      <OnboardingStepFormContent />
    </OnboardingSection>
  )
}
In the footer, we display the OnboardingPrimaryNavigation, which contains the "Back" and "Next" buttons. The "Back" button is visible for every step except the first one. The "Next" button is always visible, but it will be disabled if the isNextStepDisabled value is not false, and it will display a tooltip with the reason for the disability. When clicking on the "Next" button, the setCurrentStep function is called with the next step as an argument. If the current step is the last one, the "Next" button will redirect the user to the home page.
import { HStack } from "@lib/ui/layout/Stack"
import styled from "styled-components"
import { useOnboarding } from "./OnboardingProvider"
import { Button } from "@lib/ui/buttons/Button"
import { useRouter } from "next/router"
import { AppPath } from "@increaser/ui/navigation/AppPath"
import { onboardingSteps } from "./OnboardingStep"

const Container = styled(HStack)`
  width: 100%;
  gap: 16px;
  justify-content: flex-end;
`

export const OnboardingPrimaryNavigation = () => {
  const { currentStep, setCurrentStep, isNextStepDisabled } = useOnboarding()

  const { push } = useRouter()

  return (
    <Container>
      {onboardingSteps.indexOf(currentStep) > 0 && (
        <Button
          onClick={() => {
            const previousStep =
              onboardingSteps[onboardingSteps.indexOf(currentStep) - 1]
            if (previousStep) {
              setCurrentStep(previousStep)
            }
          }}
          kind="secondary"
          type="button"
          size="l"
        >
          Back
        </Button>
      )}
      <Button
        onClick={() => {
          const nextStep =
            onboardingSteps[onboardingSteps.indexOf(currentStep) + 1]
          if (nextStep) {
            setCurrentStep(nextStep)
          } else {
            push(AppPath.Home)
          }
        }}
        isDisabled={isNextStepDisabled}
        size="l"
      >
        Next
      </Button>
    </Container>
  )
}
The OnboardingStepFormContent component matches the current step to the appropriate interactive content. This is achieved using the Match component, which is a part of RadzionKit.
import { useOnboarding } from "./OnboardingProvider"

import { Match } from "@lib/ui/base/Match"
import { ProjectsOnboardingStep } from "./projects/ProjectsOnboardingStep"
import { WorkBudgetOnboardingStep } from "./WorkBudgetOnboardingStep"
import { WeeklyGoalsOnboardingStep } from "./weeklyGoals/WeeklyGoalsOnboardingStep"
import { ScheduleOnboardingStep } from "./ScheduleOnboardingStep"
import { TasksOnboardingStep } from "./TasksOnboardingStep"
import { HabitsOnboardingStep } from "./habits/HabitsOnboardingStep"
import { FocusOnboardingStep } from "./focus/FocusOnboardingStep"

export const OnboardingStepFormContent = () => {
  const { currentStep } = useOnboarding()

  return (
    <Match
      value={currentStep}
      projects={() => <ProjectsOnboardingStep />}
      workBudget={() => <WorkBudgetOnboardingStep />}
      weeklyGoals={() => <WeeklyGoalsOnboardingStep />}
      schedule={() => <ScheduleOnboardingStep />}
      dailyHabits={() => <HabitsOnboardingStep />}
      tasks={() => <TasksOnboardingStep />}
      focus={() => <FocusOnboardingStep />}
    />
  )
}
Example: The ProjectsOnboardingStep Component
We won't delve into the details of each step, but let's take a look at the ProjectsOnboardingStep component as an example. It consists of two sections: a form for adding a new project and a list of added projects. When there are no projects, we display an information block that encourages the user to add at least one project. Each action made in this component is reflected in the global state and the database, ensuring that if the user leaves the onboarding page and returns, they will see the same state as before. Additionally, we strive to keep the UI on the onboarding page as simple as possible. Once the user adds a project, they can only delete it, as supporting project editing would make the UI more complex. There is no data loss if the user deletes something on the onboarding page because they haven't started using the app yet.
import { useProjects } from "@increaser/ui/projects/ProjectsProvider"
import { isEmpty } from "@lib/utils/array/isEmpty"
import { CreateProjectForm } from "./CreateProjectForm"
import { VStack } from "@lib/ui/layout/Stack"
import { ProjectItem } from "./ProjectItem"
import { UniformColumnGrid } from "@lib/ui/layout/UniformColumnGrid"
import { InputContainer } from "@lib/ui/inputs/InputContainer"
import { LabelText } from "@lib/ui/inputs/LabelText"
import { ShyInfoBlock } from "@lib/ui/info/ShyInfoBlock"

export const ProjectsOnboardingStep = () => {
  const { activeProjects } = useProjects()

  return (
    <VStack style={{ maxWidth: 440 }} gap={40}>
      <CreateProjectForm />
      <InputContainer as="div" style={{ gap: 8 }}>
        <LabelText size={16}>Your projects</LabelText>
        {isEmpty(activeProjects) ? (
          <ShyInfoBlock>Add at least one project to get started.</ShyInfoBlock>
        ) : (
          <UniformColumnGrid gap={16} minChildrenWidth={160}>
            {activeProjects.map((value) => (
              <ProjectItem value={value} key={value.id} />
            ))}
          </UniformColumnGrid>
        )}
      </InputContainer>
    </VStack>
  )
}
Enhancing Learning with the OnboardingStepEducation Component
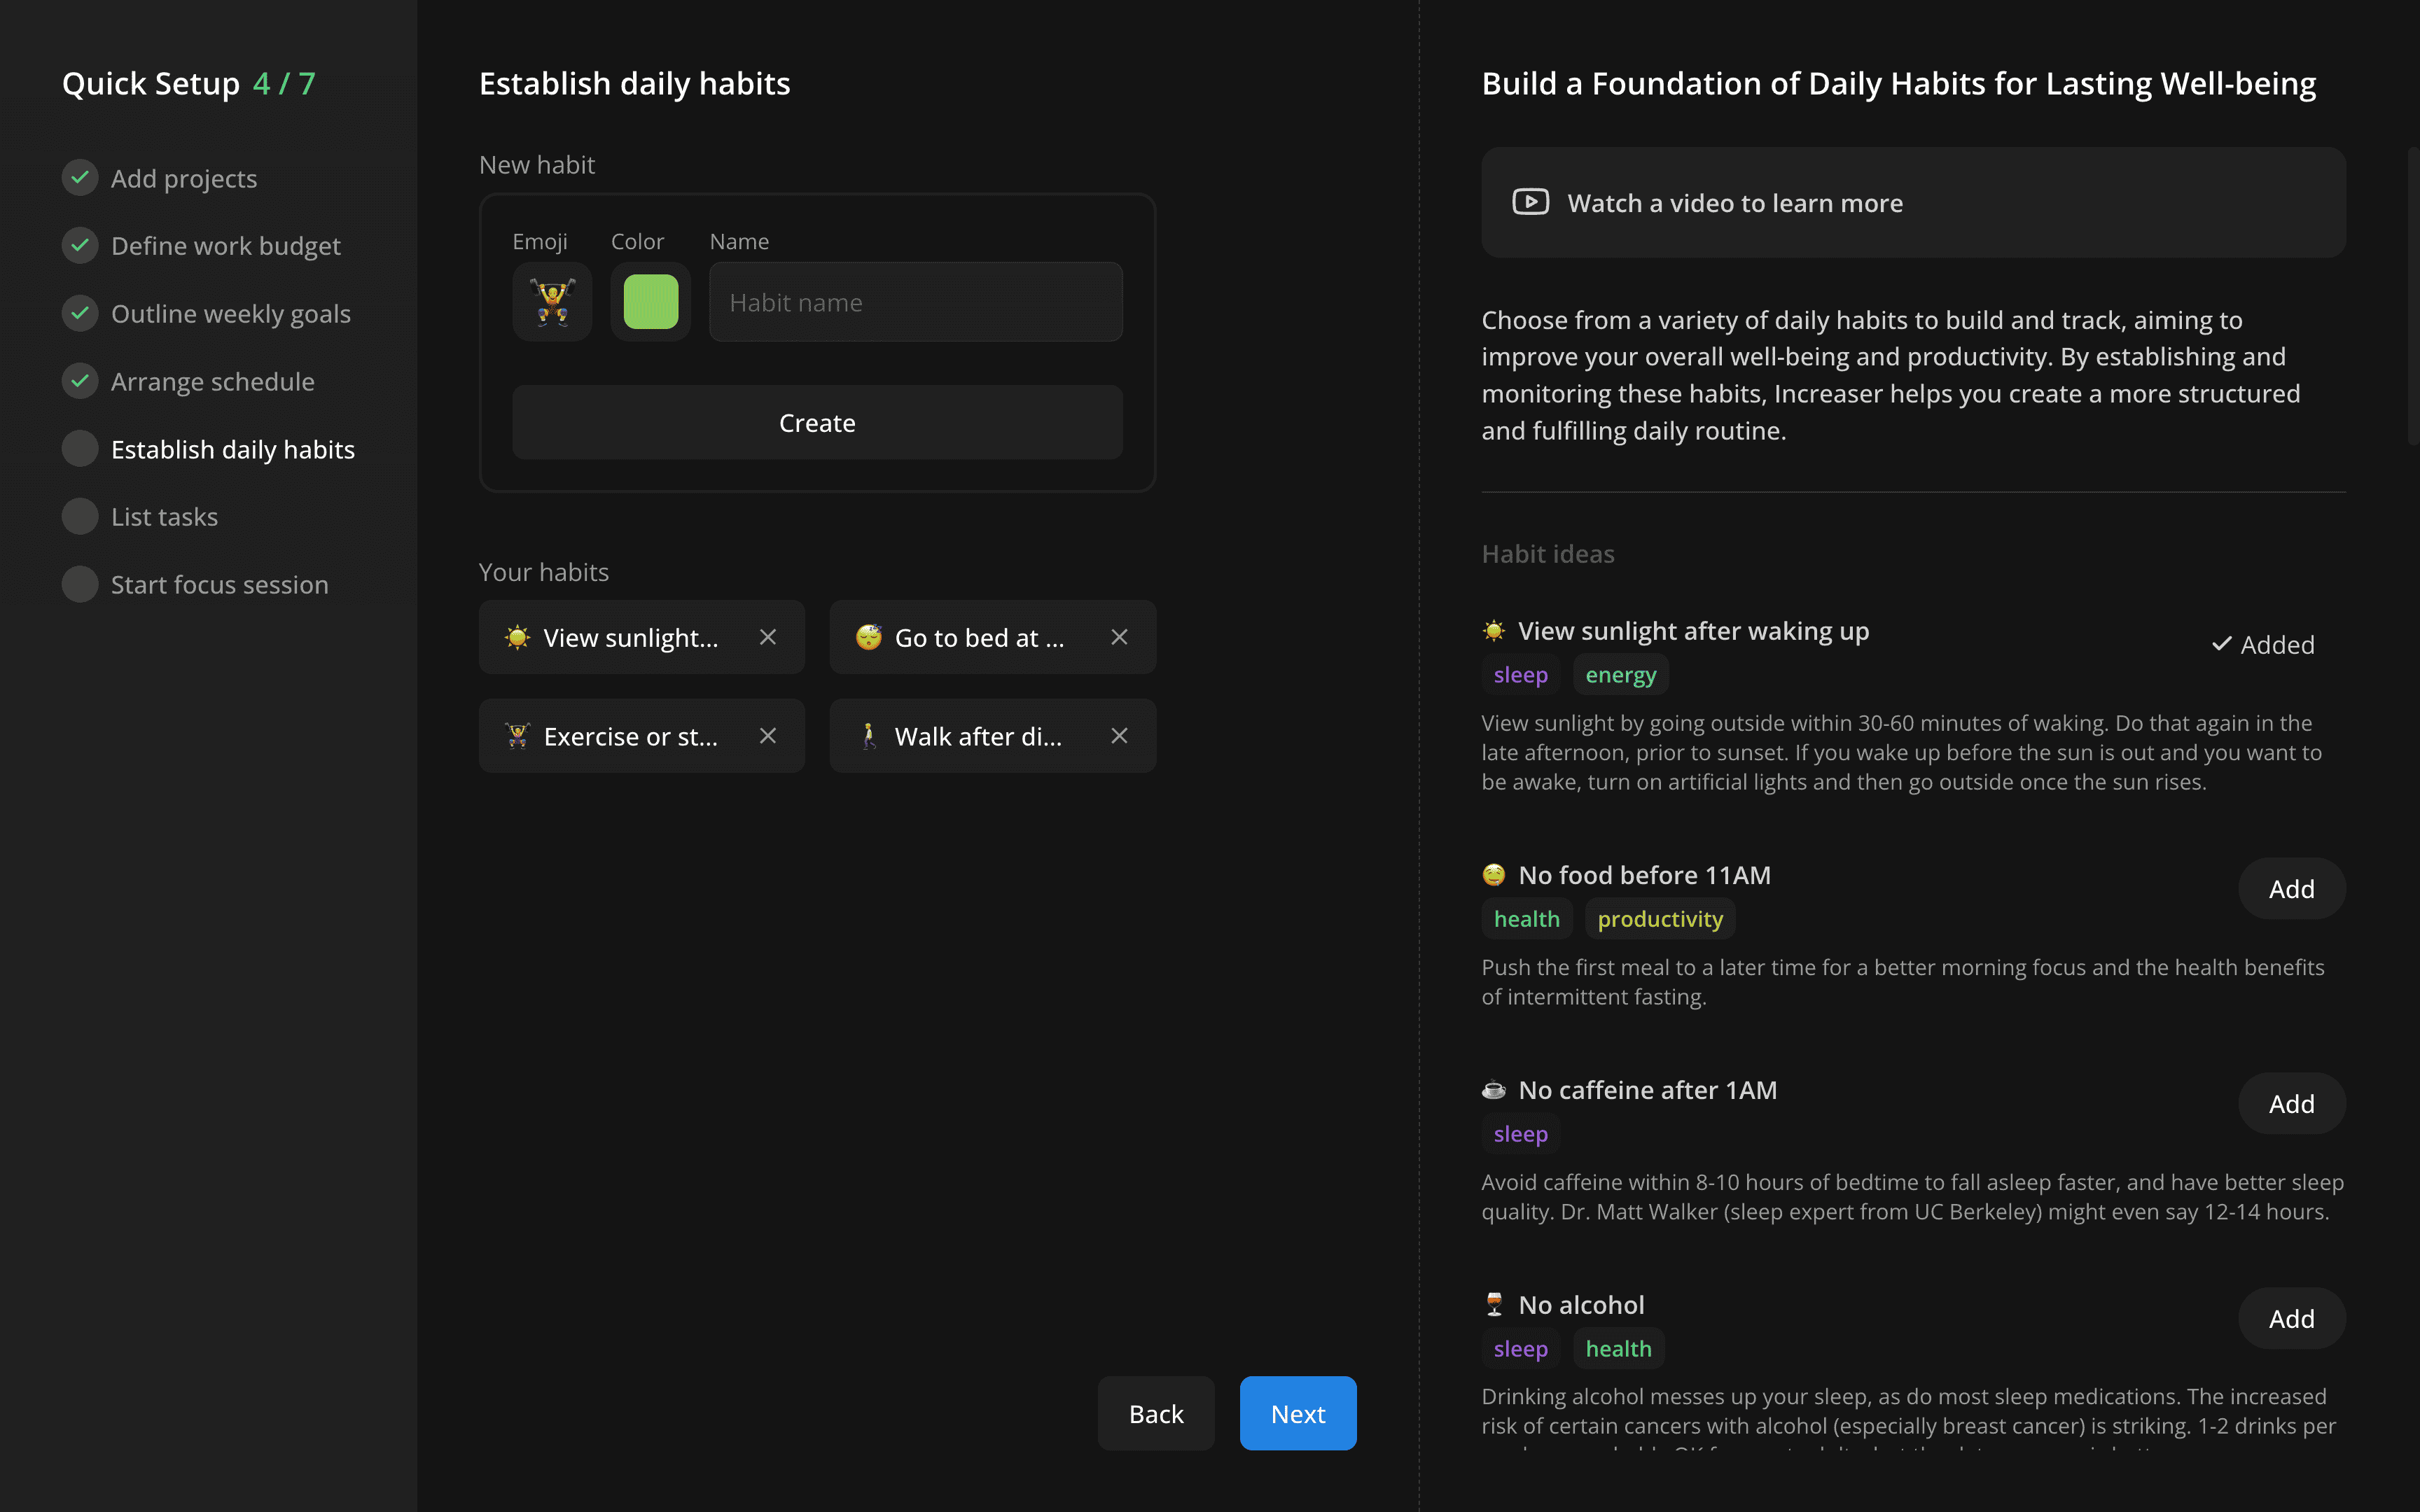
The last section of the onboarding page is the OnboardingStepEducation component. Here, we use titles that are different from those in the overview and form sections to make them more encouraging and informative. The content of this section has three parts: a video, a text block, and extra content that depends on the current step. For now, this additional content is only applicable to the "Daily Habits" step, where we display a list of curated habits that the user can add to their daily habits with a single click.
import { Match } from "@lib/ui/base/Match"
import { useOnboarding } from "./OnboardingProvider"
import { Text } from "@lib/ui/text"
import { OnboardingSection } from "./OnboardingSection"
import { OnboardingVideo } from "./OnboardingVideo"
import { CuratedHabits } from "../habits/components/CuratedHabits"
import { VStack } from "@lib/ui/layout/Stack"
import { SeparatedByLine } from "@lib/ui/layout/SeparatedByLine"
import { OnboardingStep } from "./OnboardingStep"

const onboardingStepTitle: Record<OnboardingStep, string> = {
  projects: "Identify Your Key Projects to Track in Increaser",
  workBudget: "Balance Your Week with a Custom Work Budget",
  weeklyGoals: "Allocate Weekly Hours to Reach Your Project Goals",
  schedule: "Design Your Day for Optimal Health and Productivity",
  dailyHabits: "Build a Foundation of Daily Habits for Lasting Well-being",
  tasks: "Elevate Your Day with Priority Tasks at a Glance",
  focus: "Boost Your Focus with Targeted Work Sessions",
}

export const OnboardingStepEducation = () => {
  const { currentStep } = useOnboarding()
  return (
    <OnboardingSection title={onboardingStepTitle[currentStep]}>
      <SeparatedByLine gap={28}>
        <VStack gap={28}>
          <OnboardingVideo />
          <Text weight="semibold" height="large">
            <Match
              value={currentStep}
              projects={() => (
                <>
                  Begin by adding projects that represent your focused
                  endeavors, such as studying, remote work, freelancing, or
                  business projects. This initial step is crucial as it allows
                  you to organize your work sessions, providing clarity and
                  structure to your day. By categorizing your activities, you'll
                  be able to analyze your time allocation and identify areas for
                  improvement, ultimately enhancing your productivity in tasks
                  that demand concentration. Go ahead and add your primary
                  focused activities now, and keep in mind, you can always
                  introduce more projects later!
                </>
              )}
              workBudget={() => (
                <>
                  Define your work week by establishing a customized work
                  budget, creating harmony between professional and personal
                  time. Decide on your work hours for weekdays and weekends,
                  fostering a routine that maintains focus and promotes overall
                  well-being. This deliberate approach enables you to prioritize
                  your time and energy effectively. Set your work budget now to
                  take charge of your schedule and enhance your productivity.
                </>
              )}
              weeklyGoals={() => (
                <>
                  Establish weekly goals for key projects where increased effort
                  will be most impactful. This approach encourages targeted
                  dedication and helps in tracking significant progress on the
                  projects that truly benefit from extra attention.
                </>
              )}
              schedule={() => (
                <>
                  Customize your daily schedule to align with your health and
                  productivity goals by choosing wake-up, work, meal, and sleep
                  times, while adhering to beneficial routines like intermittent
                  fasting and relaxation periods for a healthier work-life
                  balance.
                </>
              )}
              dailyHabits={() => (
                <>
                  Choose from a variety of daily habits to build and track,
                  aiming to improve your overall well-being and productivity. By
                  establishing and monitoring these habits, Increaser helps you
                  create a more structured and fulfilling daily routine.
                </>
              )}
              tasks={() => (
                <>
                  Keep your focus razor-sharp with Increaser's task
                  organization. By adding your key tasks to the designated
                  sections for today, tomorrow, this week, and next week, you
                  prioritize your workflow and ensure nothing important falls
                  through the cracks. It's not just about listing tasks; it's
                  about creating a strategic plan that aligns with your
                  productivity goals. Take a moment to sort your tasks and
                  maintain clarity as you navigate your workweek.
                </>
              )}
              focus={() => (
                <VStack gap={8}>
                  <Text>
                    According to Andrew Huberman, the best duration for focused
                    work is around 90 minutes. While you can improve your
                    ability to focus through different protocols, quality sleep,
                    and consistent physical activities, most of us are limited
                    to two or three 90 minutes blocks of deep work a day. Try
                    doing more than that, and you'll quickly experience
                    diminishing returns in productivity.
                  </Text>
                  <Text>
                    You can divide the 90-minute block into a few sessions with
                    small breaks or do it in one go. After one such block of
                    work, it's good to have quality decompression time for at
                    least 30 minutes where you are not focusing on anything
                    specific and give your mind quality recovery time, e.g.
                    cleaning, cooking, or exercising, but try to escape using
                    the phone or checking social media.
                  </Text>
                  <Text>
                    An easy scheduling technique to consistently finish work
                    early is to do 90 minutes block before breakfast and one
                    after. That way, you will also get health benefits from
                    intermittent fasting by pushing the first meal to later in
                    the day.
                  </Text>
                </VStack>
              )}
            />
          </Text>
        </VStack>
        <Match
          value={currentStep}
          projects={() => null}
          workBudget={() => null}
          weeklyGoals={() => null}
          schedule={() => null}
          dailyHabits={() => (
            <VStack gap={28}>
              <Text color="shy" weight="bold">
                Habit ideas
              </Text>
              <CuratedHabits />
            </VStack>
          )}
          tasks={() => null}
          focus={() => null}
        />
      </SeparatedByLine>
    </OnboardingSection>
  )
}
To better explain the app's concepts, we also have a video for each step. Each video is relatively short, around one minute long, where I try to persuade the user to complete the step because it will help them become more productive or enhance their lifestyle. The only exception is the last video, which is from Andrew Huberman's podcast. In this video, he explains the value of 90-minute work sessions and how to focus better.
import { useOnboarding } from "./OnboardingProvider"
import { OnboardingStep } from "./OnboardingStep"
import { OnboardingVideoPrompt } from "@lib/ui/onboarding/OnboardingVideoPrompt"
import { OnboardingVideoPlayer } from "./OnboardingVideoPlayer"

const onboardingYouTubeVideo: Partial<Record<OnboardingStep, string>> = {
  projects: "https://youtu.be/PvDLR4rbWXw",
  workBudget: "https://youtu.be/TYsp-iDsBuM",
  weeklyGoals: "https://youtu.be/T9C2mJk-LB4",
  schedule: "https://youtu.be/__zDYzlKPrE",
  dailyHabits: "https://youtu.be/e2AQa9uHGz8",
  tasks: "https://youtu.be/IYMY2W4gDkw",
  focus: "https://youtu.be/5HINgMMTzPE",
}

export const OnboardingVideo = () => {
  const { currentStep } = useOnboarding()

  const youTubeVideoUrl = onboardingYouTubeVideo[currentStep]

  if (!youTubeVideoUrl) {
    return null
  }

  return (
    <OnboardingVideoPrompt
      renderVideo={() => (
        <OnboardingVideoPlayer youTubeVideoUrl={youTubeVideoUrl} />
      )}
    />
  )
}
The OnboardingVideoPrompt component displays a panel prompting the user to watch a video to learn more. The panel is interactive; when the user hovers over it, the background and text colors change. Upon clicking the panel, it expands to reveal the video, and a close button appears in the top right corner, making only the button interactive. Clicking the close button collapses the panel back to its original state. To make the component more generic, it doesn't assume how the video will be displayed. Instead, it expects a function in its props that will render the video.
import { interactive } from "@lib/ui/css/interactive"
import { Panel } from "@lib/ui/panel/Panel"
import { getColor } from "@lib/ui/theme/getters"
import { ReactNode, useState } from "react"
import styled, { css } from "styled-components"
import { transition } from "@lib/ui/css/transition"
import { HStack } from "@lib/ui/layout/Stack"
import { Text } from "@lib/ui/text"
import { IconWrapper } from "@lib/ui/icons/IconWrapper"
import { YouTubeIcon } from "@lib/ui/icons/YouTubeIcon"
import { CloseButton } from "@lib/ui/buttons/CloseButton"

type OnboardingVideoPromptProps = {
  renderVideo: () => ReactNode
}

const Container = styled(Panel)<{ isInteractive: boolean }>`
  ${({ isInteractive }) =>
    isInteractive &&
    css`
      ${interactive};
      ${transition};
      &:hover {
        background: ${getColor("mistExtra")};
        color: ${getColor("contrast")};
      }
    `}
`

export const OnboardingVideoPrompt = ({
  renderVideo,
}: OnboardingVideoPromptProps) => {
  const [isOpen, setIsOpen] = useState(false)

  return (
    <Container
      withSections
      isInteractive={!isOpen}
      onClick={isOpen ? undefined : () => setIsOpen(true)}
    >
      <HStack
        alignItems="center"
        justifyContent="space-between"
        fullWidth
        gap={20}
        style={{ minHeight: 72 }}
      >
        <HStack alignItems="center" gap={12}>
          <IconWrapper style={{ fontSize: 24 }}>
            <YouTubeIcon />
          </IconWrapper>
          <Text weight="bold">Watch a video to learn more</Text>
        </HStack>
        {isOpen && (
          <CloseButton kind="secondary" onClick={() => setIsOpen(false)} />
        )}
      </HStack>
      {isOpen && renderVideo()}
    </Container>
  )
}
To render the video, we use the react-player library. We manage the isPlaying state with the useBoolean hook. To provide the correct size for the YouTube video player, we rely on the ElementSizeAware component to measure the available width and calculate the height based on the 9:16 ratio, which is the default aspect ratio for YouTube videos.
import { ElementSizeAware } from "@lib/ui/base/ElementSizeAware"
import { useBoolean } from "@lib/ui/hooks/useBoolean"
import YouTubePlayer from "react-player/lazy"
import styled from "styled-components"

type OnboardingVideoPlayerProps = {
  youTubeVideoUrl: string
}

const youTubeVideoRatio = 9 / 16

const Container = styled.div`
  padding: 0;
`

export const OnboardingVideoPlayer = ({
  youTubeVideoUrl,
}: OnboardingVideoPlayerProps) => {
  const [isPlaying, { set: play, unset: pause }] = useBoolean(true)

  return (
    <ElementSizeAware
      render={({ setElement, size }) => {
        return (
          <Container ref={setElement}>
            {size && (
              <YouTubePlayer
                isActive
                width={size.width}
                height={size.width * youTubeVideoRatio}
                url={youTubeVideoUrl}
                playing={isPlaying}
                onPause={pause}
                onPlay={play}
                config={{
                  youtube: {
                    playerVars: { autoplay: 1, controls: 1 },
                  },
                }}
              />
            )}
          </Container>
        )
      }}
    />
  )
}
Creating a Mobile-Friendly Onboarding Experience
Since all the components involved in the onboarding process are responsive and flexible, we can also construct a mobile version of the onboarding page. In this version, we omit the progress and education sections, displaying only the form section. However, if you want to add some additional content, you can easily integrate collapsible sections or tabs. As the container, we use the Modal component, which is part of RadzionKit. It will occupy the entire space on small screens while keeping the title and footer always visible and making the content scrollable.
import { Modal } from "@lib/ui/modal"
import { OnboardingStepFormContent } from "./OnboardingStepFormContent"
import { useOnboarding } from "./OnboardingProvider"
import { OnboardingPrimaryNavigation } from "./OnboardingPrimaryNavigation"
import { onboardingStepTargetName } from "./OnboardingStep"

export const SmallScreenOnboarding = () => {
  const { currentStep } = useOnboarding()

  return (
    <Modal
      footer={<OnboardingPrimaryNavigation />}
      title={onboardingStepTargetName[currentStep]}
    >
      <OnboardingStepFormContent />
    </Modal>
  )
}